Timers
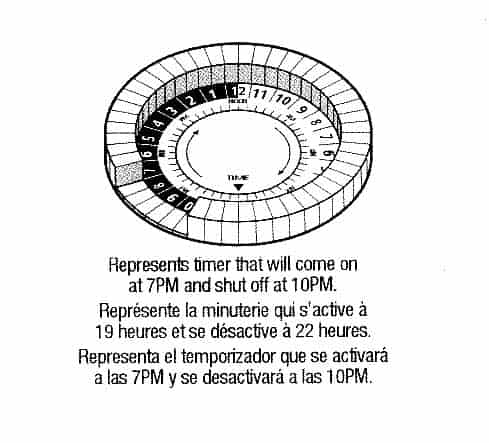
Outlet Timer
SETTING ON/OFF PERIODS:
Timer can set up to 48 On/Off commands a day. Using your finger, pen or screwdriver, pull up all pins that correspond to desired “Off” timer. For desired “on” time, make sure pins are pushed down. Each pin represents 30 minutes: 2 pins = 1 hour.
SETTING TIME:
Turn dial clockwise until triangular pointer is pointing at actual time. Be sure switch on top of unit is set to TIMER ON.
CONNECTION:
Once desired On/Off times and actual time are set, plug timer into wall outlet, and plug device(s) into tier. Be sure wall outlet and device are turned on. Timer will start to operate, turning device On/Off according to pre-set commands.
MANUAL ON/OFF:
Pre-set On/Off commands can be interrupted by using manual override switch, located on top of unit. When switched to OULET ON, connected device is switched on permanently. To reactivate timer’s control of device, turn device switch on and set timer’s override switch to TIMER ON. In case of power failure, reset timer as explained above.
Digital Timer
WHAT THIS TIMER DOES:
Your timer can be programmed to turn your wine cabinet on and off automatically, once per day.
Plug the timer into the outlet and wait for at least 30 minutes to charge the built-in rechargeable battery. This will allow the timer to be programmed and keep time even when it is not plugged in. The timer must be plugged into wall outlet to operate your cabinet.
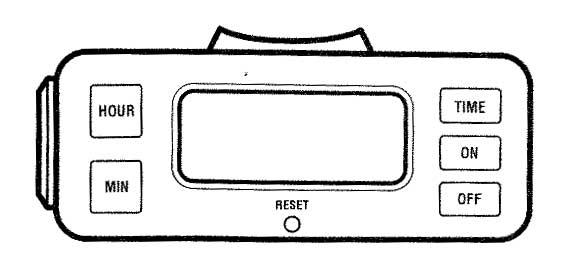
The first time you use the timer, press the reset button with a pointed object to reset and clear any previously set program. Be sure to charge the battery as noted above.
SETTING THE TIMER:
Slide the switch on top to “TIMER”.
To set to the current time:
- To set the current minute, hold the TIME button down and press MINUTE until the current minute is displayed.
- The timer will display and keep the current time when the TIME button is released. (Example: Display will read “TIME 4:30 PM”)
To set the time at which your cabinet will turn ON:
- While holding the ON button down, press HOUR until the desired “on” hour is displayed (noting AM or PM)
- To set the “ON” minute, hold ON and press MINUTE until the desired “on” minute is displayed. (Example: display will read “ON 6:30 PM”)
- The timer will display current time when the ON button is released. To view the programmed “on” time, press ON.
To set the time at which your cabinet will turn OFF:
- While holding the OFF button down, press HOUR until the desired “off” hour is displayed (noting AM or PM)
- To set the “Off” minute, hold OFF and press MINUTE until the desired “on” minute is displayed. (Example: display will read “OFF 6:30 PM”)
- The timer will display current time when the OFF button is released. To view the programmed “off” time, press OFF.
“Always On” Mode:
- Slide the top to ON FOR “ALWAYS ON” MODES.
- Slide the switch to TIMER to return control.
TROUBLESHOOTING GUIDE:
Lights do not turn on, even when timer is in “Always On” position.
- Lights are not in “ON” position, lights are not functioning, or timer is not receiving power.
- Be sure that lights are functional by plugging them directly into the outlet. Be sure that lights are in “ON position if they have their own switch. Be sure that the outlet that the timer is plugged into is active.
Lights do not turn ON and OFF at the requested time.
- Replace the batteries in the timer, and/or reset the timer by inserting a sharp object such as a paper clip into the reset hole.
Wireless RF Remote Control System
SETUP INSTRUCTIONS:
Please Note: The Plug-in Receiver must be located within 100 feet of the Wall Transmitter.
1. Remove Front Cover of Wall Transmitter by turning the two white Cover Screws on the Front Cover counter-clockwise.
2. Remove plastic Battery Tab by gently pulling it from Battery Compartment (this tab isolates the battery until it’s ready for use and insures that you’ll have a fresh battery).
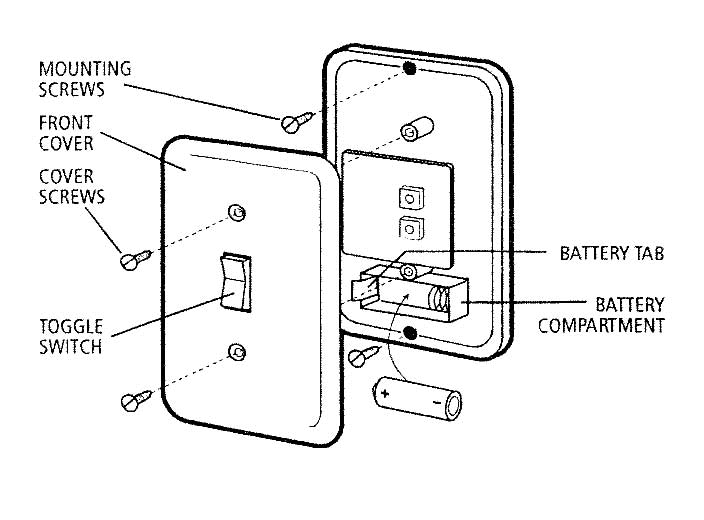
3. Reinstall Front Cover using 2 Cover Screws. Set Wall Transmitter aside.
4. Plug your light/appliance into the outlet on the Receiver being careful to match the wide blade of the light/appliance (if equipped) with the wide slot on the outlet.
5. Plug the Receiver into any standard grounded 110/120 Volt outlet being careful to match the wide blade of the Receiver with the wide slot on the outlet. Fully insert.
6. Before mounting the Wall Transmitter, hold the Wall Transmitter at the location where you wish to install. Press Toggle Switch to determine if your light/appliance turns on and off. If your light/appliance does not respond try relocating the Transmitter or Receiver. Large metal objects such as metal doors or cabinets should not be in the way of the Wall Transmitter and Plug-in Receiver since this could decrease the range of the RF signal.
7. Once you have successfully completed this test, remove Front Cover once again and mount Wall Transmitter with two enclosed Mounting Screws. (Surfaces other than wood may require different type of mounting hardware.)
8. Replace Front Cover of Wall Transmitter and secure to wall switch with white Cover Screws (do not over-tighten).
OPERATION:
Simply press the Toggle Switch to turn the light/appliance you’ve plugged into the Receiver on or off. Note: Wait at least 3 seconds after you press the transmitter on or off before you press it again. This Allows for the RF signal transmission to be Completed.
BATTERY REPLACEMENT:
Your RFK100 battery should last 2-3 years under normal use.
To replace battery:
-
-
- Remove Front Cover of Wall Transmitter by turning the two white Cover Screws on the Front counter-clockwise.
- Remove battery from Battery Compartment and replace with another 12Volt battery (Radio Shack 23, 23M, VR22, EL22 or equivalent).
- Replace Front Cover and Screw.
-
TROUBLESHOOTING GUIDE:
Symptom: Light does not turn on.
-
-
- Circuit breaker or fuse is turned off.
- Switch on lamp is turned off.
- Bulb is defective.
- Weak battery.
- Lamp module or lamp is loose.
-
Symptom: Light does not turn off.
-
-
- Transmitter signals are being blocked. Check for metal objects that could block the signal of reposition the transmitter.
- Switching too fast. Wait 3 seconds between toggles.
- Weak battery.
-
Symptom: Light comes on randomly
-
-
- Short-term power line failure.
- Transmitter out of range.
- Lamp module or lamp is loose.
-